Note: the article has been published originally on to my Medium account: https://medium.com/@ms.kaleia/re-build-scalable-iot-system-91b7eac71935
Two years ago I worked on an Internet of Things system that does reading weather information from weather stations and submit the readings into a server to record these readings into a database and visualize them into a UI. (I got to work only on the backend side of it)
The project was pretty easy. we have 15 weather stations, every station is attached to Linux box BeagleBone that reads the weather data from the sensors and send these data over a bidirectional WebSocket connection with the server. The server reads the data and stores them in a simple relational database. The system is very small and no need to scale it at this size, but just and to learn new stuff I decided to build a similar system that can scale if the number of stations got increased.
The rest of this post I will explain the proposed architecture along with the code used in the demo implementation.

The architecture

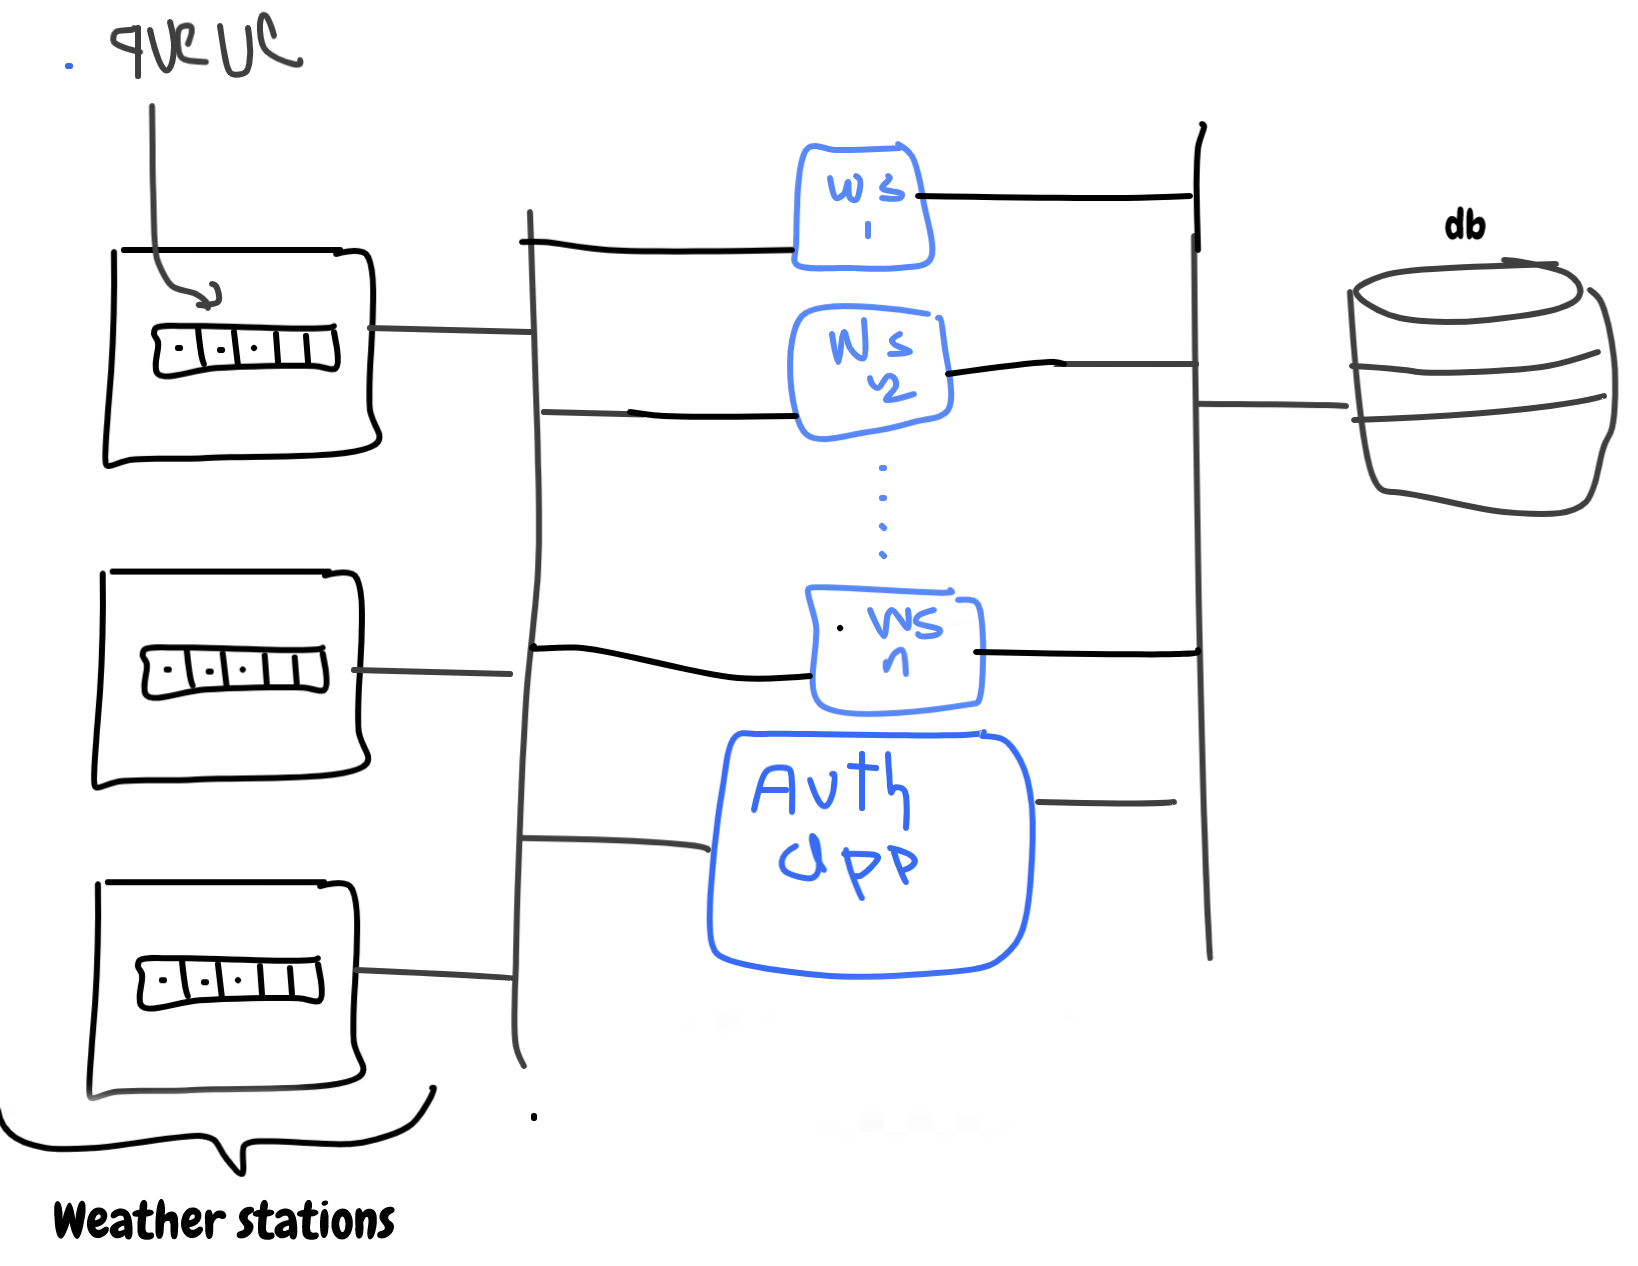
In this system, we have three main components, the weather stations, server apps, and a datastore. The weather stations connect with the server and send messages through a bidirectional WebSocket connection. The server receives the incoming messages from clients and stores them in the database. For authentication, we will need HTTP API with JWT to authenticate clients. This is a very high-level view, let's dive little deeper into each component:
Weather Station
The station (client) is a Linux box connected to a weather station. This weather station reads the temperature, humidity, wind speed, and other information related to the weather. We need to read the weather data every x amount of time and send it immediately to the server, if the internet connection between the station and the server is not available we should store the messages locally and send them once the internet is back.
For saving messages in case of lost internet connection, I used a message queue that can be used as a work or job queue, where we have a producer which reads weather data and enqueue the weather data as a message in the queue and consumers that read messages from the queue and send them to the server.
The same message queue can be configured to preserve messages incase the consumers fail in sending the messages to the server and try to send them again later once the issue is solved (the internet is back).
I will talk more about message queue implementation later.
Server-side
The server side consists of two main components, the message queue WebSocket app, and the auth app. The message queue app is used to receive messages from the clients and store them in the db. The auth app is used to authenticate the clients before they can send any message.
Websocket app: a WebSocket connection has been used to create a bidirectional connection between the client and the server and a message queue has been used to store the messages in a job queue wherein its simplest form the workers are just pulling messages from the queue and store them in the datastore. The messages in the queue containing a timestamp that is created by the clients when the message is created.
Auth app: for any client to be able to send messages it has to be authenticated. JSON Web Authentication JWT has been used to provide authentication. An HTTP API can be used to send a token when the client login with its account_id and password. Then the client includes this token with every message sent to the server.
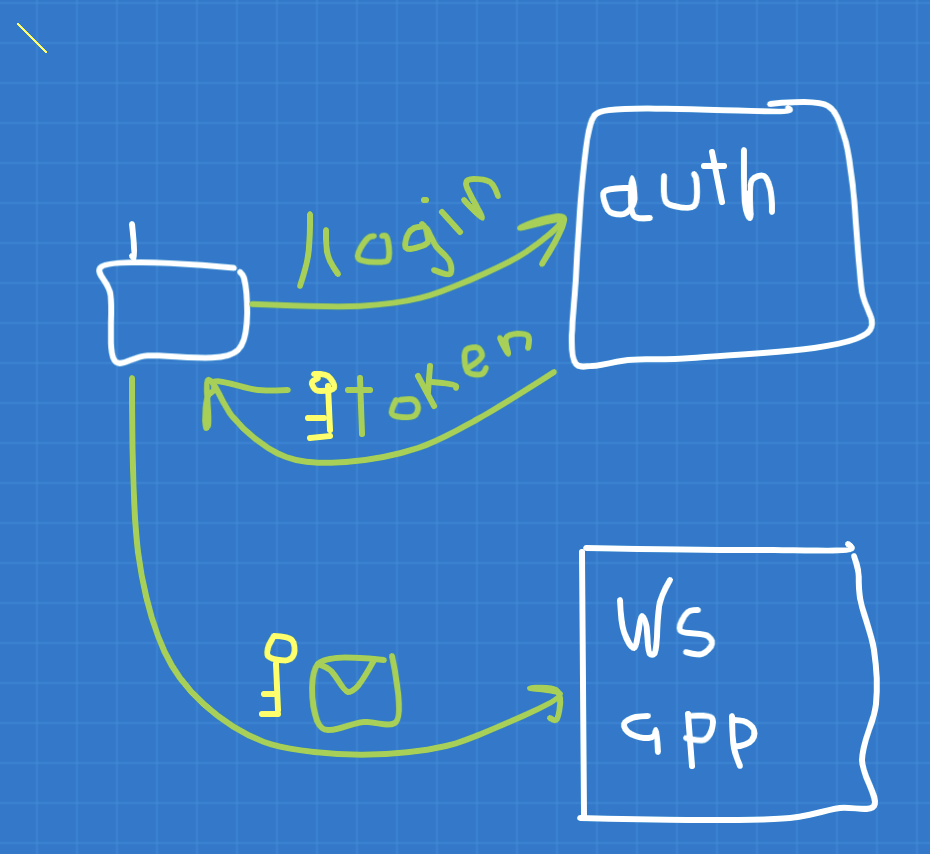
The idea of JWT auth is very simple, the client sends a post request to the server `/login` endpoint with its username and password, the server verifies the user information and returns a token that is generated by the server using its private key. Then the client stores this token and send it along with every message. When the server receives a message it tries to decrypt the token to verify the token.
Datastore
To store the data it is good to use a reliable engine like Postgresql or Mysql. For me, since the purpose of this demo was not for production I used a document-based database called tinydb (it works!) I created two tables one for the weather and the other one for the users. Basically, just dump the weather messages coming from the client into the weather table in its JSON format. Now, let's move to the implementation part:

Implementation
Here is the stack I used for the implementation:
- Flask: used to deliver endpoints required for authentication (web app)
- RabbitMQ: I used RabbitMQ for the message queue, (easy enough with nice documentation)
- Python
- Tinydb: document-based database, not recommended for production at all, I used for the quick demo only
Requirements
Before I start the implementation, you will need to have the following stuff installed, Python, RabbitMQ server. The rest of the libraries you can install in your virtual env.
For the requirements you can run:
pip install -r requirements.txt
I structured the project in a very simple way:
- server.py (this is the WebSocket server)
- station.py (this file should run on the clients)
- config.py
- app.py: authentication Flask app is in here
- user.py: the logic to create, authenticate a user
Client
import random
import pika
import sys
import config
import json
import time
import asyncio
import requests

from concurrent.futures import ProcessPoolExecutor


LOCAL_QUEUE = 'task_queue'
REMOTE_QUEUE = 'message_queue'


class LoginError(Exception):
    pass


class Station:
    def __init__(self, name='st0', password='123456'):
        self.name = name
        self.password = password
        self.token = None
        self.login()

    def read(self):
        # This is just a simulation of temperature :)
        return random.choice(range(60, 100))

    def login(self):
        payload = {'name': self.name, 'password': self.password}
        r = requests.post(f"http://{config.server['url']}:5000/login", payload)
        if r.status_code != 200:
            raise LoginError("Invalid name or password")

        self.token = r.text


def produce():
    try:
        station_name = sys.argv[1]
        password = sys.argv[2]
        freq = int(sys.argv[3])
    except IndexError:
        station_name, password, freq = 'st0', '123456', 10

    connection = pika.BlockingConnection(pika.ConnectionParameters(host=config.station['url']))
    channel = connection.channel()
    channel.queue_declare(queue=LOCAL_QUEUE, durable=True)
    station = Station(name=station_name, password=password)

    for i in range(5):  # Send only 5 messages for test
        message = {
            'name': station.name,
            'temperature': station.read(),
            'timestamp': int(time.time()),
            'token': station.token
        }
        channel.basic_publish(
            exchange='',
            routing_key=LOCAL_QUEUE,
            body=json.dumps(message),
            properties=pika.BasicProperties(
                delivery_mode=2,  # make message persistent
            ))

        print(" [x] Sent %r" % message)
        time.sleep(freq)

    connection.close()


def consume():
    # Prepare the local station connection
    local_connection = pika.BlockingConnection(pika.ConnectionParameters(host=config.station['url']))
    local_channel = local_connection.channel()
    local_channel.queue_declare(queue=LOCAL_QUEUE, durable=True)

    print(' [*] Consumer is waiting for messages. To exit press CTRL+C')

    # Prepare the connection with the remote queue
    remote_connection = pika.BlockingConnection(pika.ConnectionParameters(host=config.server['url']))
    remote_channel = remote_connection.channel()
    remote_channel.queue_declare(queue=REMOTE_QUEUE, durable=True)

    def callback(ch, method, properties, body):
        print(" [x] Received %r" % body)
        print(" [x] Send message to the server %r" % body)
        remote_channel.basic_publish(
            exchange='',
            routing_key=REMOTE_QUEUE,
            body=body,
            properties=pika.BasicProperties(
                delivery_mode=2,  # make message persistent
            ))

        # Only send the ack after sucessfuly send the message to the server
        ch.basic_ack(delivery_tag=method.delivery_tag)

    local_channel.basic_qos(prefetch_count=1)
    local_channel.basic_consume(queue=LOCAL_QUEUE, on_message_callback=callback)

    local_channel.start_consuming()


if __name__ == '__main__':
    executor = ProcessPoolExecutor(2)
    loop = asyncio.get_event_loop()
    producer = asyncio.ensure_future(loop.run_in_executor(executor, produce))
    consumer = asyncio.ensure_future(loop.run_in_executor(executor, consume))
    loop.run_forever()
I don’t want to bore you with the code explanation, pretty sure you can read it and understand it your self. But the headlines are like the following:
- For the sake of the demo, I don’t have here a real weather station, so in the Station class I made a read method that a random integer that represents the temperature
- Also in the same class, we have the login method that sends a post request to the server with the username and the password to obtain the token and store it in the Station object.
- On the client-side, we create a queue named it as task_queue this queue will be used to dump the messages in and send them to the server. To do that we create a producer that reads weather temperature from the weather station and store it in the queue. We have a consumer that consumer messages from the queue and send them to the server
- The consumer sends the messages to a message queue on the server named message_queue
- Note inline 86 and 96 we set the queue to preserver the messages in case something bad happened (the client went off, or there is no internet connection)
Server
Cool.. we reached the server-side, it is simpler than the client-side I think :)
It has two parts as we saw before, the message queue and the auth app. We will start with the web socket part.
# server.py
import pika
import config
import tinydb
import json
import user

db = tinydb.TinyDB('db.json')
weather = db.table('weather')
REMOTE_QUEUE = 'message_queue'

connection = pika.BlockingConnection(pika.ConnectionParameters(host=config.server['url']))
channel = connection.channel()

channel.queue_declare(queue=REMOTE_QUEUE, durable=True)
print(' [*] Server waiting for messages. To exit press CTRL+C')


def callback(ch, method, properties, body):
    print(" [x] Received %r" % body)
    message = json.loads(body)
    user.decode_auth_token(message['token'])
    weather.insert(message)
    ch.basic_ack(delivery_tag=method.delivery_tag)


channel.basic_qos(prefetch_count=1)
channel.basic_consume(queue=REMOTE_QUEUE, on_message_callback=callback)

channel.start_consuming()
- Remember, we used here a document-based database called `tinydb` where we create a database and the weather table
- In the callback function (the function that gets called when the consumer pop work from the queue,
- The consumer will keep running and waiting for new work in the queue
Auth app
The other part is the web auth. For authentication, we used JWT which the server creates the token and returns it back in the response.
# app.py

import user as user_service

from flask import request, make_response, jsonify, Flask

app = Flask(__name__)


@app.route('/')
def hello():
    return "Hello World!"


@app.route('/login', methods=['POST'])
def login_view():
    name = request.form.get('name', None)
    password = request.form.get('password', None)
    if not name or not password:
        return make_response(jsonify({'status': 'fail', 'message': 'name and password required'})), 404

    user = user_service.get_by_name_password(name=name, password=password)
    if user:
        token = user_service.encode_auth_token(user['name']).decode('utf8')
        return token
    else:
        return make_response(jsonify({'status': 'fail', 'message': 'bad email or password'})), 404


if __name__ == '__main__':
    app.run()
In the code above we created post /login endpoint, it authorizes the name and password then creates a token and sends it back in the response.
Scale it up
The question now, how to scale this design in case we need to. To answer this question we need first to identify the bottleneck of the system. Is it the client, the WebSocket app, the Auth or the datastore. In case we got 1M clients all of them are sending messages to the server.. you guessed it .. its the WebSocket app.
To scale up the server we can simply replicate the server, and the auth app will return the queue id with the socket information so the client would know which socket server to connect with. Here is the updated architecture design:
Run the app
If you want to run the app you can pull it from here
Run the client on the station:
python station.py
Run the auth app:
python app.py
Run the WebSocket server:
python server.py
Note: Rabbitmq server should be running as well.
Conclusion
To wrap up, in this post we illustrated an architecture design for an IoT system that scales up.
As a reminder, the code we demonstrated here is not suitable for production. It was just a demo to explain the idea. The Github repo that contains the code is here: https://github.com/mohanadkaleia/rwis

Will be happy to hear your feedback.